 Intravenous (IV) therapy is one of those indispensable skills every nurse needs to master. It focuses on delivering fluids, medications, or nutrients directly into a patient’s bloodstream through a vein. The importance of understanding and executing this procedure properly cannot be overlooked as it’s essential for providing safe and efficient patient care.
Firstly, the primary purpose of IV therapy is hydration. It is a quick and efficient way to replenish fluids lost due to either dehydration, surgery, or illness. It is important to acknowledge that it is a direct lifeline for patients who need immediate fluid replacement. Whether it’s someone recovering from a tough workout or dealing with a more serious condition, IV hydration is crucial.
Secondly, administering medication is another key aspect of IV therapy. When medications need to be absorbed rapidly or controlled precisely, IV is the way to go. As nurses, you must be adept at this to ensure patients get the correct dosages and in the right time frame. Avoid error as much as you can– it’s all about precision and patient safety.
Thirdly, nutritional support might not be the first thing that comes to mind when thinking about IV therapy, but it plays a vital role. You might come across some patients who can’t take in nutrients by mouth due to various health issues or post specific surgeries. In that case, IV therapy steps in to provide those essential nutrients, contributing significantly to the patient’s recovery and well-being.
Lastly, the transfusion of blood products. This includes red blood cells, platelets, or plasma. It’s often a life-saving measure for patients who’ve lost a lot of blood or need specific blood components. Understanding how and when to administer these products is critical for effective patient care.
Generally, understanding the purposes and principles of IV therapy lays a solid foundation for novice nurses. It’s not only sticking a needle but also knowing why you’re doing it and the benefits it brings to your patients. Unavoidable, this knowledge is the most essential of skilled nursing care.
Different Types of IV Solutions
Navigating the different types of IV solutions can initially seem challenging, but it’s essential for delivering effective patient care. There are two main categories of IV solutions: crystalloids and colloids. Each has its specific purposes and uses and understanding them is vital.
Firstly, crystalloids are the most commonly used IV solutions, and they include a mix of water, electrolytes, and sometimes glucose. They’re further divided into isotonic, hypotonic, and hypertonic solutions based on their concentration relative to body fluids.
- Isotonic solutions, such as Normal Saline (0.9%) and Lactated Ringer’s (Hartmann’s), are designed to maintain fluid balance in the body. These solutions have a similar concentration to body fluids, so they stay within the vascular system and are perfect for situations requiring fluid replacement.
- While Hypotonic solutions, such as 0.45% sodium chloride (NaCl), work by moving fluids into cells. They’re useful when cells are dehydrated and need rehydration from the inside out. So, understanding when to use hypotonic solutions is crucial to avoid complications like cellular swelling.
- Meanwhile Hypertonic solutions, such as 3% NaCl, do the exact opposite. They draw fluids out of cells and into the vascular system. These solutions are typically used in critical situations where there’s a need to reduce swelling or correct electrolyte imbalances, but they require careful monitoring to avoid overcompensation.
Secondly, colloids are less common but equally important. These solutions contain larger molecules that remain in the vascular system longer, making them effective for patients needing sustained plasma volume expansion. Examples include Dextran and Hydroxyethyl Starch. They’re often used in cases of significant blood loss or severe burns.
Therefore, knowing the distinctions between these solutions and their appropriate uses is essential for novice nurses. It’s not only choosing a solution but also understanding the patient’s needs and the properties of the solution to provide optimal care. Believe me, with practice, selecting and administering the right IV solution will become second nature.
Essential IV Equipment and Their Uses
A novice nurse’s toolkit isn’t complete without a solid understanding of the essential IV equipment. Starting with the IV catheters, you’ll find they come in various sizes. Common gauges include 18G, 20G, 22G, and 24G. The choice of size depends on vein size and the type of fluid or medication you need to administer. For instance, an 18G is bigger and typically used for rapid fluid delivery or blood transfusions, while a 24G is gentler, ideal for small veins or pediatric patients.
Moving on, IV tubing connects the catheter inserted into the patient’s vein to the IV bag holding the fluid or medication. Key parts of the tubing include the drip chamber, which lets you visually monitor the drip rate, and the roller clamp, which gives you control over the flow. Knowing how to set up and adjust this tubing is crucial, as it allows you to regulate the amount of fluid the patient receives.
Let’s not forget the IV bags, which contain the fluids or medications to be administered. These come in various sizes, typically ranging from 50 ml to 1000 ml. The size you pick depends on the prescribed volume of fluids or medications. Properly inspecting the IV bag before use is important to ensure it’s not expired or damaged.
And then there’s the infusion pump, it is a lifesaver for precise fluid or medication administration. These machines regulate the flow rate, minimizing the risk of human error. Ensure to familiarize yourself with the operation and troubleshooting of infusion pumps, as they can be tricky but are incredibly valuable in ensuring accurate dosing.
For novice nurses, indeed, mastering the equipment is as vital as understanding the theory behind IV therapy. Being hands-on and practicing with the equipment boosts confidence and competency. Know your tools, their functions, and be mindful of the application to deliver the best patient care.
Mastering IV Insertion Techniques and Maintenance
 First of all, selecting the right vein is a crucial first step. Common sites for IV insertion include the forearm and hand. It’s smart to avoid areas showing signs of infection, areas with past surgeries, and veins that are too small or fragile. Using a tourniquet about 3-4 inches above the insertion site helps engorge veins, making them easier to find and access.
The next step is preparing your equipment. Hand hygiene is non-negotiable, so make sure your hands are thoroughly sterilized. Cleaning the insertion site correctly is also vital by using antiseptic wipes in a circular motion to ensure the area is properly disinfected.
When it’s time to insert the catheter, stabilize the vein using your non-dominant hand. Insert the needle at a 15–30-degree angle. Once you see blood return, it’s time to advance the catheter while simultaneously retracting the needle. This is where steady hands and confidence come into play.
Following by securing the catheter properly is crucial for keeping everything in place. Use medical tape or a securement device, and then apply a sterile dressing to protect the site. Making sure everything is secure helps prevent complications and ensures the catheter stays in place.
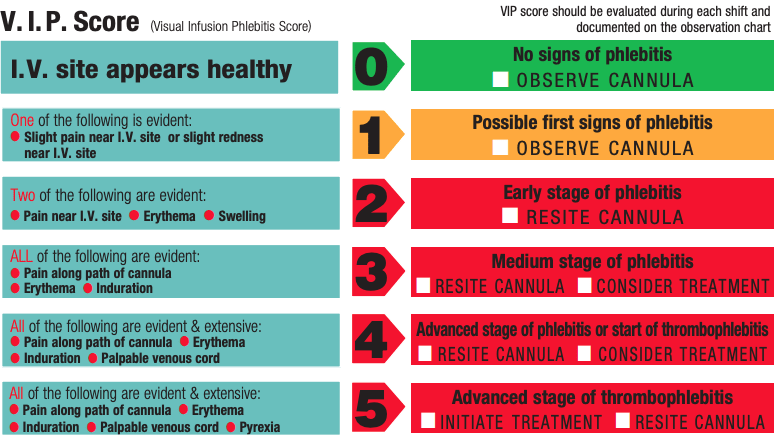
Monitoring and maintenance can’t be overlooked. Regularly check the site for signs of infection, infiltration (where fluid leaks into surrounding tissue), or phlebitis (vein inflammation) or monitor Visual Infusion Phlebitis (VIP) score from 0-5. Follow your facility’s protocols for changing dressings and tubing as well as flushing the catheter with saline helps keep it functional and prevents clotting. It’s a routine task, but it’s important for patient safety.
Complications can arise, so stay vigilant. Watch for signs of infiltration like swelling or coolness at the site, and act quickly by stopping the infusion and applying a warm compress. For phlebitis, look out for redness and warmth – stop the infusion and remove the catheter if needed. Infection signs include redness, swelling, and pus. Immediate action, including catheter removal and potentially antibiotics, might be necessary. Air embolism, though rare, is serious. If signs like sudden chest pain or shortness of breath occur, clamp the IV line, place the patient in a left lateral Trendelenburg position, and get help immediately.
Let me know your thought about this article, I highly appreciate your comments.